Understanding Timing in Animation Part 3
In Part 2 we mentioned the use of timing diagrams. These are simple graphic charts that animators use to describe the timing of an animated action or part of an action. Timing diagrams are very common place in examples of how to animate and seem relatively simple, but from experience with many people new to animating I have found that their creation and usage is not well understood. So I want to spend a little time talking about the basics of how a timing diagram is created and used.
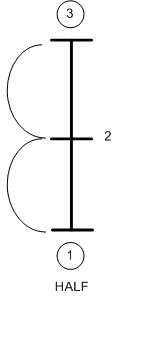 FIG 1
FIG 1
This first example of a timing diagram (FIG 1) is the most basic form. It shows two keys 1 and 3 with a single inbetween 2. The vertical bar is the time line (it could be a horizontal line or even a curved line). It just represents a segment of time by its length. The amount of time it represents is determined by the frames which are shown as numbered cross hash marks and of course the frame rate of presentation. So this example is three frames at 24 fps or 1/8th of a second. The spacing between frames is indicated by the physical distance displayed along the time line between each pair of frame marks. So in this example the drawing at frame 2 is half way spaced between drawing 1 and drawing 3. What that is telling the animator is that when he/she creates this inbetween the rate of change between frame 1 and frame 3 is equal and constant.
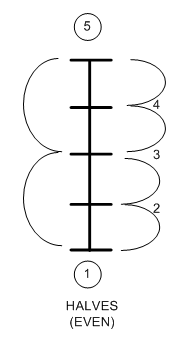 FIG 2
FIG 2
The next example (FIG 2) is similar to the first example. It shows five frames of drawings. Frames 1 and 5 are the keys. Frame 3 is a half way breakdown. And frames 2 and 4 are also halfway inbetweens. The rate of change between drawing 1 and drawing 3 is constant. The animator would draw the frame 3 inbetween drawing first after having drawn the frames 1 and 5. Then the animator would draw frame 2 using frames 1 and 3 as references and then frame 4 using frames 3 and 5 as references.
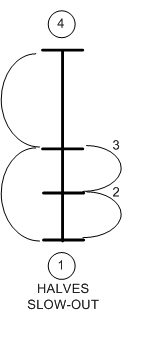 FIG 3
FIG 3
Our next example (FIG 3) shows acceleration. Frames 1 and 4 are the keys. Frame 3 is a halfway inbetween. But frame 2 is a half way inbetween for frames 1 and 3 which means that the change following frame 1 is placed to create a slowing out which accelerates between frames 3 and 4 because of the greater degree of change indicated by the larger gap.
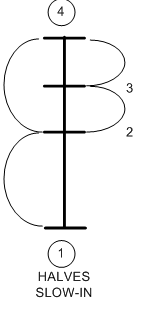 FIG 4
FIG 4
This next example (FIG 4) is just the opposite and shows a deceleration. Frames 1 and 4 are the keys. Frame 2 is a halfway inbetween. And frame 3 is a half way inbetween for frames 2 and 4 which means that the change following frame 2 is placed to create a slowing into frame 4. There is a deceleration between frames 2 and 4 because of the extra drawing which creates a closer spacing which produces a slowing effect.
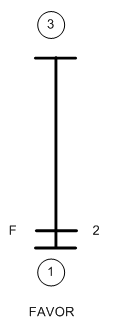 FIG 5
FIG 5
So far all of these examples have used half way inbetweens which means that each inbetween is relationally balanced with respect the preceding and following drawings in the sequence. This is not always the desired situation. Sometimes we want an inbetween to “favor” either the preceding or following drawings. This next example (FIG 5) shows the use of a favor inbetween which is only fractionally changed from drawing 1. Then there is a speed up indicated by the large gap to frame 3.
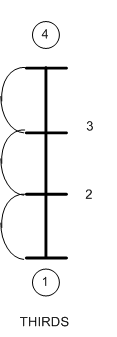 FIG 6
FIG 6
If you look again at FIG 1 and FIG 2, both of these diagrams indicate a constant rate of change, but you should notice that because the FIG 2 diagram has two additional inbetweens its action will be slower than the FIG 1 diagram’s action. But suppose we wanted our action to still have a constant rate of change but be faster than FIG 2 but slower than FIG 1. We can indicate this type of action by using “thirds” instead of “halves” for our inbetweens as shown in FIG 6. This spacing still indicates a constant rate of change between keys 1 and 4 but by having an additional inbetween as compared to the figure FIG 1 diagram we get a slower action but not as slow as indicated by the FIG 2 diagram. This can be an issue if the action looks like it is moving too fast with only one inbetween but also too slow with three inbetweens. The difficult part is finding the 1/3rd position between the two keys for the first inbetween. The second inbetween would then just be a half.
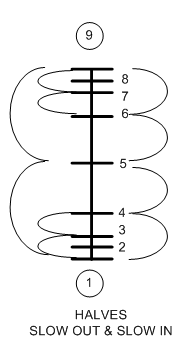 FIG 7
FIG 7
Our last example (FIG 7) is a “slow out” to a constant speed to a “slow in” diagram. All the inbetweens are halves relative to their preceding and following drawings. We are accelerating out from drawing 1 and decelerating into drawing 9, while the action is moving at a constant speed in the middle.
Two additional notes are that if we had static hold drawings or wanted to show exposures of 2’s or 3’s for example, we would just indicate that by the numbers used for the frame numbers on the chart. An omitted frame number indicates a repeat exposure. Also, some animators like to indicate the relative order of creation of the drawings by using longer hash lines for the drawing to make first and progressively shorter hash lines for the later drawings. A circled drawing number indicates a key.
Now that we have a better understanding of the meaning of these example timing diagrams, we will be ready in the next part of this series to begin talking about timing and how we translate some physical world’s effects into our timing charts.
Continued in Part 4
 FIG 1
FIG 1This first example of a timing diagram (FIG 1) is the most basic form. It shows two keys 1 and 3 with a single inbetween 2. The vertical bar is the time line (it could be a horizontal line or even a curved line). It just represents a segment of time by its length. The amount of time it represents is determined by the frames which are shown as numbered cross hash marks and of course the frame rate of presentation. So this example is three frames at 24 fps or 1/8th of a second. The spacing between frames is indicated by the physical distance displayed along the time line between each pair of frame marks. So in this example the drawing at frame 2 is half way spaced between drawing 1 and drawing 3. What that is telling the animator is that when he/she creates this inbetween the rate of change between frame 1 and frame 3 is equal and constant.
 FIG 2
FIG 2The next example (FIG 2) is similar to the first example. It shows five frames of drawings. Frames 1 and 5 are the keys. Frame 3 is a half way breakdown. And frames 2 and 4 are also halfway inbetweens. The rate of change between drawing 1 and drawing 3 is constant. The animator would draw the frame 3 inbetween drawing first after having drawn the frames 1 and 5. Then the animator would draw frame 2 using frames 1 and 3 as references and then frame 4 using frames 3 and 5 as references.
 FIG 3
FIG 3Our next example (FIG 3) shows acceleration. Frames 1 and 4 are the keys. Frame 3 is a halfway inbetween. But frame 2 is a half way inbetween for frames 1 and 3 which means that the change following frame 1 is placed to create a slowing out which accelerates between frames 3 and 4 because of the greater degree of change indicated by the larger gap.
 FIG 4
FIG 4This next example (FIG 4) is just the opposite and shows a deceleration. Frames 1 and 4 are the keys. Frame 2 is a halfway inbetween. And frame 3 is a half way inbetween for frames 2 and 4 which means that the change following frame 2 is placed to create a slowing into frame 4. There is a deceleration between frames 2 and 4 because of the extra drawing which creates a closer spacing which produces a slowing effect.
 FIG 5
FIG 5So far all of these examples have used half way inbetweens which means that each inbetween is relationally balanced with respect the preceding and following drawings in the sequence. This is not always the desired situation. Sometimes we want an inbetween to “favor” either the preceding or following drawings. This next example (FIG 5) shows the use of a favor inbetween which is only fractionally changed from drawing 1. Then there is a speed up indicated by the large gap to frame 3.
 FIG 6
FIG 6If you look again at FIG 1 and FIG 2, both of these diagrams indicate a constant rate of change, but you should notice that because the FIG 2 diagram has two additional inbetweens its action will be slower than the FIG 1 diagram’s action. But suppose we wanted our action to still have a constant rate of change but be faster than FIG 2 but slower than FIG 1. We can indicate this type of action by using “thirds” instead of “halves” for our inbetweens as shown in FIG 6. This spacing still indicates a constant rate of change between keys 1 and 4 but by having an additional inbetween as compared to the figure FIG 1 diagram we get a slower action but not as slow as indicated by the FIG 2 diagram. This can be an issue if the action looks like it is moving too fast with only one inbetween but also too slow with three inbetweens. The difficult part is finding the 1/3rd position between the two keys for the first inbetween. The second inbetween would then just be a half.
 FIG 7
FIG 7Our last example (FIG 7) is a “slow out” to a constant speed to a “slow in” diagram. All the inbetweens are halves relative to their preceding and following drawings. We are accelerating out from drawing 1 and decelerating into drawing 9, while the action is moving at a constant speed in the middle.
Two additional notes are that if we had static hold drawings or wanted to show exposures of 2’s or 3’s for example, we would just indicate that by the numbers used for the frame numbers on the chart. An omitted frame number indicates a repeat exposure. Also, some animators like to indicate the relative order of creation of the drawings by using longer hash lines for the drawing to make first and progressively shorter hash lines for the later drawings. A circled drawing number indicates a key.
Now that we have a better understanding of the meaning of these example timing diagrams, we will be ready in the next part of this series to begin talking about timing and how we translate some physical world’s effects into our timing charts.
Continued in Part 4

5 Comments:
I'm a little confused by the wording in this last post:
"Our last example (FIG 7) is a “slow out” to a constant speed to a “slow in” diagram."
This sounds as if you start with a slow out, then move at a constant rate, then end with a slow in.
This is contrary to the way Flash uses these terms (and thus, how I learned them)--at least I think it is, it's been a while since I've used Flash.
Are the terms used differently in Flash as opposed to classical animation?
I checked and I can see why the Flash terms would be so confusing. In Flash they use the term easing for setting a cushion in a tween. In Flash you "Ease In" to achive what I call a "Slow Out" and in Flash you "Ease Out" to achieve what I call a "Slow In". It just goes to show you that there are many ways to describe the same sort of thing. I always looked at it as starting off slowly and speeding up, that is moving slow "out" of a pose. And going from a faster speed to a slower speed or stop as moving slow "in" to a pose. I suppose the designers of Flash view it as "Easing In" is speeding up and "Easing Out" is slowing down. That's their terms but it sure isn't very logical to me. We just want to focus on the concepts of acceleration and deceleration. To avoid future confusion I'll try to talk in those terms. I suspect that different animators verbalize it differently based on how they view this sort of change in motion.
It also confused me... verbally, but the actual concept came across perfectly, and when animating I think one wouldn't do the opposite of what one wants, just because of the wording. Heck, one could call one "rocketing" and the other one "stepping on the brakes"; in fact I'll do that from now on. Keep it up JK, amazing work. I look forward to your next posting.
Thanks for the comment Renato. Let's not get too hung up on semantics. Most animators, who learned their craft prior to the advent of computer animation software, use "slow in" and "slow out" the same as I have indicated. "Slow in" is a deceleration and "slow out" is an acceleration. So you can safely do so yourself.
I'm glad you are enjoying the articles and I appreciate all the feedback. Most importantly I'm glad that readers, like yourself, are not having trouble understanding the concepts as I'm presenting them.
Just to clarify, the concept was extremely clear and well presented.
The only reason I was interested in the exact (and proper) wording was to avoid possible misunderstandings when speaking to professional animators (hopefully, receiving orders from them...someday...).
I agree that the doing is much more important than the wording, but knowing the meaning of established terms will certainly help with communication.
Again, JK, I'm loving the blog. Thanks...
Post a Comment
<< Home