| © Connected Concepts LLC. 1998-2007 All Rights Reserved |
|
Toon Boom Studio FAQ Pages - Keyframes |
||||
|
Tweening Motion or Maintaining Values between Keyframes Toon Boom Studio can automatically generate inbetween drawings when you move, scale, rotate or skew elements with pegs. This process of generating inbetween transition drawings is known as interpolation or motion tweening. By default, when you add keyframes to pegs, Toon Boom Studio tweens the drawings animated by the peg. You can use a preference setting to change the default keyframe/tweening behavior of pegs. This setting is located on the scene planning tab of preferences. You can set the default value to constant or non-constant segments. You may not want to use interpolation to control the animation. To do this, you must change a segment between two keyframes from a tweened segment to a constant segment. When you create constant segments, images switch from one to the other without any interpolation. To tween the images between two keyframes you must change the segment from a constant segment to a non-constant (tweened) segment. When you tween images on a motion path, tick marks appear on the motion path to indicate each position of the image as it is interpolated. You can switch segments between constant and non-constant using menu commands or the Function Editor. Basics Keyframes, on a peg, lock to a specific frame a change in position, angle or scale . To add a motion, rotation and scaling keyframe: 1. Select a Peg element in the Timeline window. 2. Select the frame you want to add the keyframe to.
3. Select Element > Peg > Add Keyframe. Depending on the tool you have selected (Select, Motion, Rotate or Scale), keyframes appear on the selected frame.
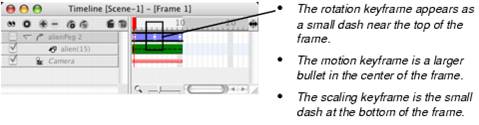
The tool you have selected determines what kind of keyframe you create.
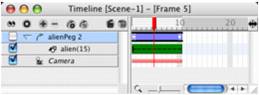
Marks in the Timeline identify keyframes for motion, rotation, skewing or scaling.
Copying and Pasting Keyframes You can copy and paste the values of a keyframe to another keyframe. The values you copy and paste depend on the tool you have selected.
To copy and paste keyframe values: 1. In the Timeline window, select the peg element. 2. Then, use the red frame slider to select the frame whose values you want to copy.
3. From the Tools menu, select the tool whose values you want to copy. 4. Select Edit > Copy Cell to copy the values of the frame. 5. In the Timeline window, use the red frame slider to select the frame where you want to paste the copied values. 6. Select Edit > Paste Cell to paste the values to the frame. The Toon Boom Studio creates a keyframe if one does not already exist. You can also use the Paste Special command to copy selected values from the original keyframe (including tension, continuity, bias, rotation, scale and pivot) to another keyframe. You can even copy values from a control point, which is a motion point that is not locked to a specific frame, to another control point or keyframe. To remove keyframe values: Use the Remove Keyframe command to delete the selected keyframe from the peg. Use the Function Editor if you want to remove the velocity and pivot data from the frame. |
||||
|
Back Stage |
|
|||
|
© Connected Concepts LLC. 1998-2009 All Rights Reserved |
||||