Drop Shadow Technique
One of the really fun features of Toon Boom Studio is the Drop Shadow Effect. In this tutorial I'm going to show how to apply a drop shadow effect to an animated character. The first step was to create a simple animation of our ant character walking in place. This animated cycle consists of 12 cells all in a single element. Just some simple hand drawn animation. I could have used multiple elements for this animation (head, body, right arm, left arm, etc.) but I chose to do it with a single element. This drop shadow technique would work in either case.

I'm going to have the ant walk across the stage so I'll use my 12 cell sequence and the Create Cycle command to repeat this basic walk in place cycle for 8 loops.
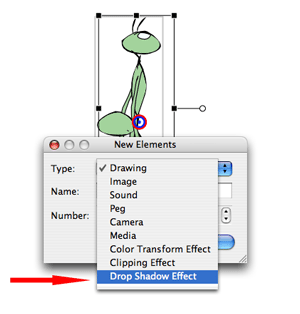
Next I will add a new element of the type Drop Shadow Effect to my timeline panel.
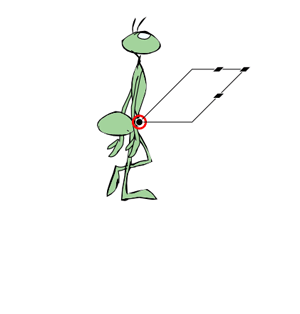
When I first add the Drop Shadow Effect to the timeline track list, no shadow appears because nothing is attached to the effect to generate the shadow. I do see a parallelogram looking tool icon that will be useful in a minute.
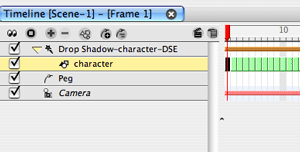
To generate a shadow I need to attach my character to the Drop Shadow Effect. It is just like attaching to a peg element. Just drag the character track, or tracks if you used multiple elements for your character, over the top of the Drop Shadow Effect track label.
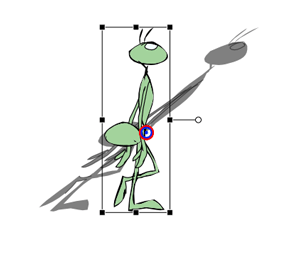
Once the character is attached to the Drop Shadow Effect we can see his shadow. Of course it doesn't look correct yet because we need to position and orient his shadow.
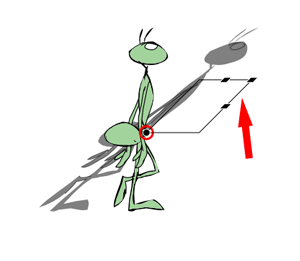
Using the grab handles on the parallelogram looking tool is how we will manipulate and orient our drop shadow.
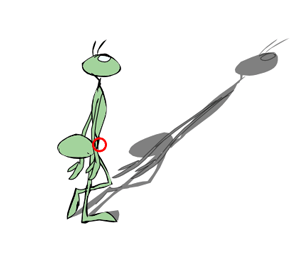
We could just drag the shadow to match up to the character's feet as in this example, but shadows are created by "light" sources so we have to orient our shadow depending on the direction and intensity of our imaginary "light" source.
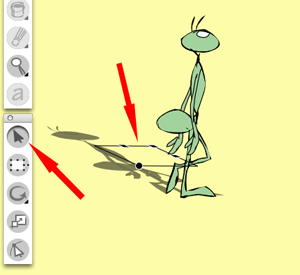
The scene operation select tool needs to be active and the track for the Drop Shadow Effect must be selected in the timeline panel so that we can use the grab handles to adjust and orient our shadow to our character. This is a trial and error learning process using those grab handles but with a little practice it gets really easy.
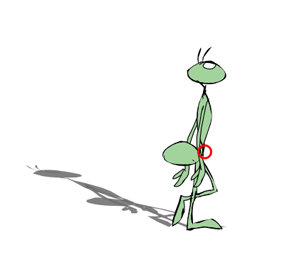
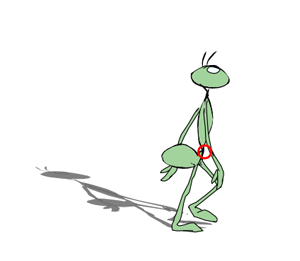
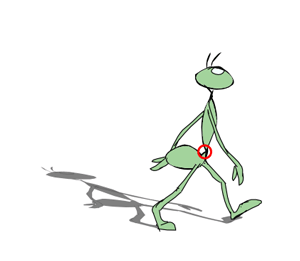
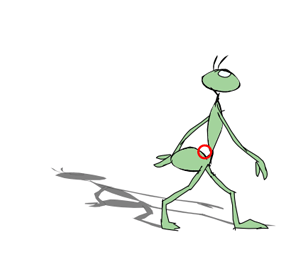
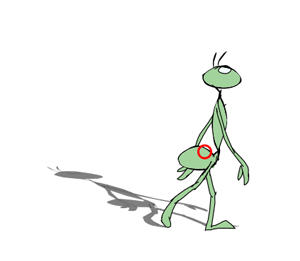
Once we adjust the size and orientation of the shadow and its relative positioning, TBS will in real-time render the shadow to match each cell in our character animation sequence. We don't have to do anything after we get it set on the first cell of the sequence. It is just like when Wendy sews on Peter Pan's shadow. (trivial reference) Below are a few of the cells in our sequence so you can see that the shadow is being generated as we scrub from cell to cell. I told you it was a fun feature.
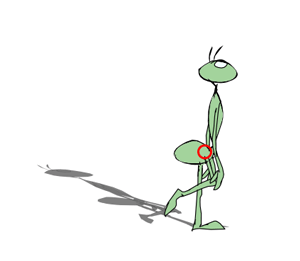
So now we have our character doing a looping walk cycle in place with his faithful shadow marching along. We need to add a motion path to get him off dead center and going across the screen. So I added a peg element to the timeline panel and renamed it "character-P".
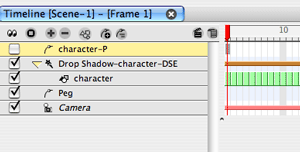
We will create our motion path with this new peg element. So we need to attach the hierarchy of our drop shadow effect and it child character to the character-P peg. The easiest way to do this is to collapse the drop shadow effect and drag it over the top of the character-P peg track label. The order of this hierarchy is important because the shadow being connected to our in place character walk cycle will now also follow the motion path with the character.
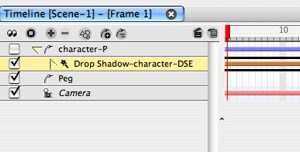
With the shadow and the character both attached to the character-P peg, we collapse the peg and we will make the motion tool active and add a motion keyframe at the beginning frame of our animation and a second motion keyframe at the ending of our animation.
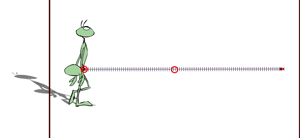
With these two motion keyframes in place and connected by a non-constant segment we can move the character and his faithful shadow to our starting and ending locations for our motion path.
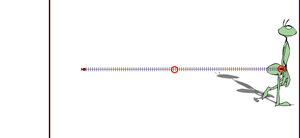
If we scrub the timeline, we will see that the character now moves across the screen along the motion path and his faithful shadow is right there step for step as he goes.
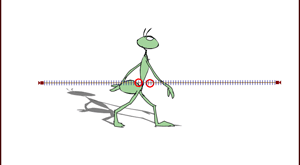
Please notice we did not have to draw the shadow, and we did not have to do anything but attach the shadow and orient it on the first frame of our cycle. Had this been the shadow for a fixed prop like a rock or a tree it would work the same, you just wouldn't have the shadow moving if its object wasn't moving.
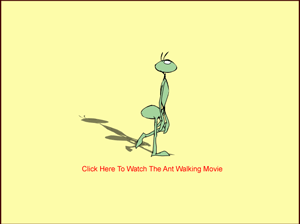
Click on the image above to watch the final movie.
As I said Drop Shadow Effects are fun and easy to use. They do slow down final rendering because they are complex to render and they do increase your SWF file size significantly, but animating a shadow could not be much easier. I hope this tutorial gets you going with Drop Shadow Effects.

I'm going to have the ant walk across the stage so I'll use my 12 cell sequence and the Create Cycle command to repeat this basic walk in place cycle for 8 loops.

Next I will add a new element of the type Drop Shadow Effect to my timeline panel.

When I first add the Drop Shadow Effect to the timeline track list, no shadow appears because nothing is attached to the effect to generate the shadow. I do see a parallelogram looking tool icon that will be useful in a minute.

To generate a shadow I need to attach my character to the Drop Shadow Effect. It is just like attaching to a peg element. Just drag the character track, or tracks if you used multiple elements for your character, over the top of the Drop Shadow Effect track label.

Once the character is attached to the Drop Shadow Effect we can see his shadow. Of course it doesn't look correct yet because we need to position and orient his shadow.

Using the grab handles on the parallelogram looking tool is how we will manipulate and orient our drop shadow.

We could just drag the shadow to match up to the character's feet as in this example, but shadows are created by "light" sources so we have to orient our shadow depending on the direction and intensity of our imaginary "light" source.

The scene operation select tool needs to be active and the track for the Drop Shadow Effect must be selected in the timeline panel so that we can use the grab handles to adjust and orient our shadow to our character. This is a trial and error learning process using those grab handles but with a little practice it gets really easy.

Once we adjust the size and orientation of the shadow and its relative positioning, TBS will in real-time render the shadow to match each cell in our character animation sequence. We don't have to do anything after we get it set on the first cell of the sequence. It is just like when Wendy sews on Peter Pan's shadow. (trivial reference) Below are a few of the cells in our sequence so you can see that the shadow is being generated as we scrub from cell to cell. I told you it was a fun feature.


So now we have our character doing a looping walk cycle in place with his faithful shadow marching along. We need to add a motion path to get him off dead center and going across the screen. So I added a peg element to the timeline panel and renamed it "character-P".

We will create our motion path with this new peg element. So we need to attach the hierarchy of our drop shadow effect and it child character to the character-P peg. The easiest way to do this is to collapse the drop shadow effect and drag it over the top of the character-P peg track label. The order of this hierarchy is important because the shadow being connected to our in place character walk cycle will now also follow the motion path with the character.

With the shadow and the character both attached to the character-P peg, we collapse the peg and we will make the motion tool active and add a motion keyframe at the beginning frame of our animation and a second motion keyframe at the ending of our animation.

With these two motion keyframes in place and connected by a non-constant segment we can move the character and his faithful shadow to our starting and ending locations for our motion path.

If we scrub the timeline, we will see that the character now moves across the screen along the motion path and his faithful shadow is right there step for step as he goes.

Please notice we did not have to draw the shadow, and we did not have to do anything but attach the shadow and orient it on the first frame of our cycle. Had this been the shadow for a fixed prop like a rock or a tree it would work the same, you just wouldn't have the shadow moving if its object wasn't moving.

Click on the image above to watch the final movie.
As I said Drop Shadow Effects are fun and easy to use. They do slow down final rendering because they are complex to render and they do increase your SWF file size significantly, but animating a shadow could not be much easier. I hope this tutorial gets you going with Drop Shadow Effects.
Labels: Tutorial


6 Comments:
Thanks for the step-by-step directions! This will really help me and my students!
well it looks like everyone's been busy writing while I've been gone. Always great to get more tips from you JK, helpful & informative as always :)
Cheers
The Toon Boom Shadow feature is really great! I just wish there was a way to edit the shadow dynamically inbetween. The approach I use is that whenever I need to change the shadow at some point of time I continue the animation in a whole new layer.I wish later version allow us to change shadows dynamically.
Thanks for the tutorial!
Do you know if there is any way to add a peg to the shadow so it follows a different path then the element it is attached to?
For instance having a character jump and keeping the shadow of the character on the ground instead of following him up into the air.
This would be so helpful for my current project, thanks.
The drop shadow effect has it limitations and unfortunately the ability to key frame animate the shadow separate from the object it is shadowing is not available.
For your situation I would suggest that you manually animate the shadow during the character's jumping. This would require that you use a different set of elements for your character during that bit of action. That way you get the advantages of the drop shadow effect most of the time and still have control of the shadow when you need it. I hope that gives you some ideas.
Thanks JK. I was going to go that route, but I hoped there was another way.
Post a Comment
<< Home