Creating A Custom Color Palette
Recently there was a question asked on the Toon Boom Studio forums pertaining to having a "web safe" color palette. This question was referring to a standard set of colors that works with most browsers and client hardware on the Internet. Now I'm not a website designer, so I won't venture into discussing the merits of only using these "web safe" colors for your cartoons, but the question did prompt me to want to write a brief tutorial showing how easy it is to build a custom color palette in Toon Boom Studio. There could be many more articles and tutorials written here about the great color management system in TBS, so this may just be the first of many to come in the future.
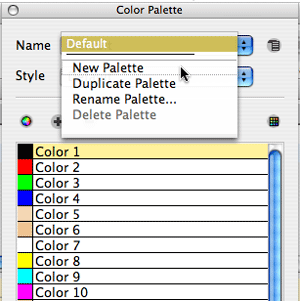
We will start building our custom color palette by navigating to the "color palette" panel in TBS. If you are using V3.5 or lower you will find this panel as a tab on the "properties" panel set. In V4.0 this panel can be seen as a separate panel depending on how you set up your workspace layout. The first thing we need to do is to select "New Pallet" from the name drop down box.
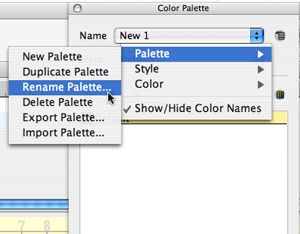
This creates a new palette and it gets the name "New 1" by default. We want to rename this palette to something more meaningful. So we will click on the context menu icon to the right of the "name" drop down text box, which will open the context menu for us to use to select "Rename Palette".
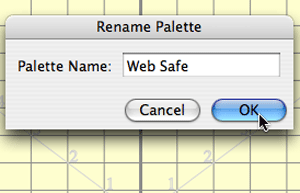
This opens a dialog box where we can enter a name for our new palette. In this case we will name our palette "Web Safe" to indicate that it will contain our set of "web safe" colors.
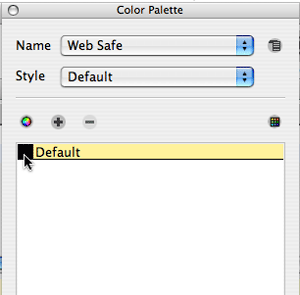
Now that we have named our new color palette, we go to the initial color in that palette, which is currently named "Default", and we double click on that color swatch to open a color edit dialog panel. I'm working on a Mac so this is the OSX standard color picker dialog, but other than a slight difference in the appearance of this color picker with the standard Windows PC color picker the process is identical.
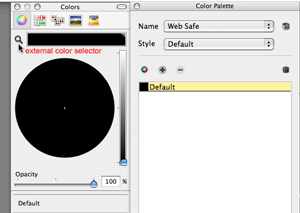
The color editor dialog has an external color selector, on the Mac it is a little magnifying glass icon while on the Windows PC it is an eye dropper icon. (not to be confused with the eye dropper tool included in the TBS drawing tools). This external color selector is used to clone a copy of any color that you choose by dragging it over the top of that color anywhere on your display and clicking to select it.
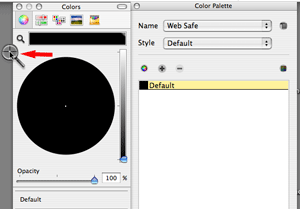
In the picture above I have started to drag the external color selector from the color edit panel.
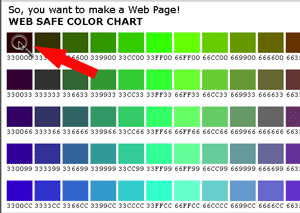
For this tutorial example I'm using a "Web Safe" color chart as my color source. I could use any source of color that can be seen on my display so it could be almost any graphic or photo etc. I have included a link to a full size version of this "Web Safe" chart at the end of this tutorial for those interested in building their own set of web safe colors. I just drag the external color selector over the top of the desired color and click on it to clone it to my color edit panel and to my currently selected color palette swatch. How easy is that?!
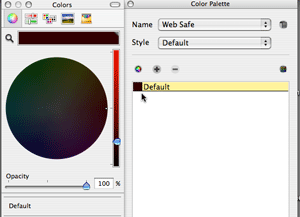
Now that I have my first color selected, I can edit the color name as desired. I changed "Default" to the color name from the web safe chart for this color which is "330000". That's a personal preference, I could have just as easily named it "dark burgundy" or whatever .
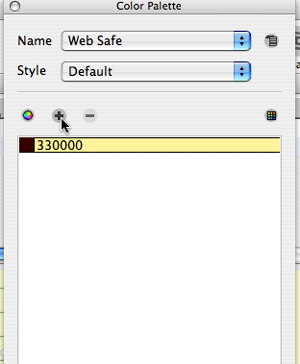
That's all there is to capturing a color swatch to your custom color palette. So next I click on the "+" sign icon to add another color swatch to my palette. I then double click on that new swatch to open the color edit panel and I use the external color selector to clone my next color exactly as I did before except I selected a different color from my "Web Safe" chart.
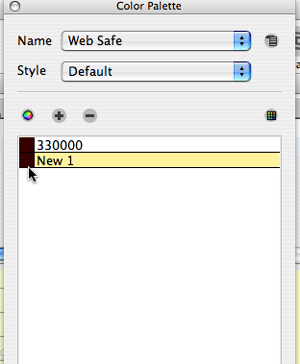
I rename the newly added color and then repeat the process to add another color swatch and clone in the next color from my "Web Safe" chart.
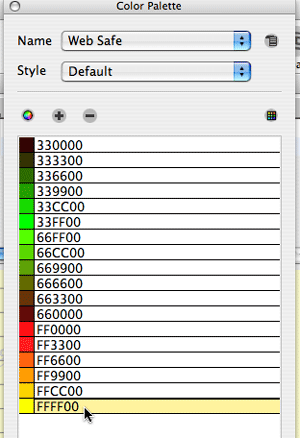
As you can see I am filling my palette with the colors from the "Web Safe" chart. The order in which I add the colors is a personal preference. And this process works for building any color palette set of colors not just one of "web safe" colors as I'm doing in this example.
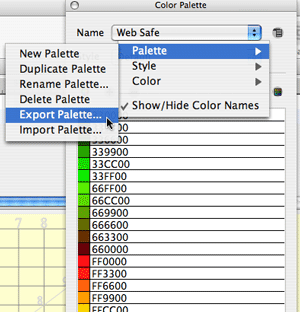
When I finish building my new custom color palette, I want to save it for reuse in many future TBS projects. Right now it is specific to the project in which I am currently working. I want to "export" my "Web Safe" color palette. We will click on the context menu icon to the right of the "name" drop down text box, which will open the context menu for us to use to select "Export Palette".
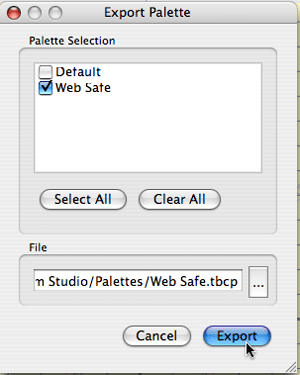
This opens an export dialog panel where all my current project color palettes are listed and I can check which ones I want to export and the destination of where I want them saved on my system. I have a Toon Boom Studio directory with a Palettes subdirectory on my system but that's just a personal preference. That's all there is to exporting and saving a custom color palette, which you can now access and use in future TBS projects.
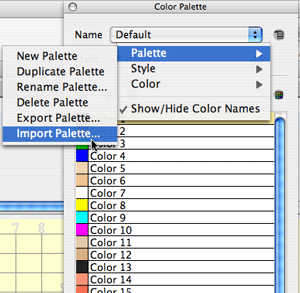
It is very easy to import a custom color palette into a new project. We just go to our color palette panel and we click on the context menu icon to the right of the "name" drop down text box, which will open the context menu for us to use to select "Import Palette".
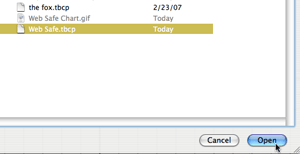
This opens an import dialog where we can select the desired custom palette we want to import into our TBS project.
As I mentioned earlier there is a great deal more information pertaining to all the uses of the Toon Boom Studio color management system so check back for future articles and tutorials.
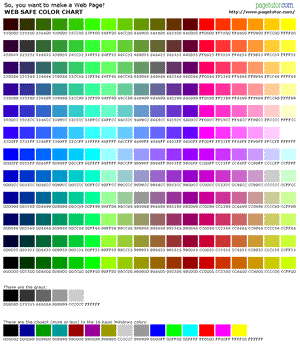
Click on this chart to access a full size version.

We will start building our custom color palette by navigating to the "color palette" panel in TBS. If you are using V3.5 or lower you will find this panel as a tab on the "properties" panel set. In V4.0 this panel can be seen as a separate panel depending on how you set up your workspace layout. The first thing we need to do is to select "New Pallet" from the name drop down box.

This creates a new palette and it gets the name "New 1" by default. We want to rename this palette to something more meaningful. So we will click on the context menu icon to the right of the "name" drop down text box, which will open the context menu for us to use to select "Rename Palette".

This opens a dialog box where we can enter a name for our new palette. In this case we will name our palette "Web Safe" to indicate that it will contain our set of "web safe" colors.

Now that we have named our new color palette, we go to the initial color in that palette, which is currently named "Default", and we double click on that color swatch to open a color edit dialog panel. I'm working on a Mac so this is the OSX standard color picker dialog, but other than a slight difference in the appearance of this color picker with the standard Windows PC color picker the process is identical.

The color editor dialog has an external color selector, on the Mac it is a little magnifying glass icon while on the Windows PC it is an eye dropper icon. (not to be confused with the eye dropper tool included in the TBS drawing tools). This external color selector is used to clone a copy of any color that you choose by dragging it over the top of that color anywhere on your display and clicking to select it.

In the picture above I have started to drag the external color selector from the color edit panel.

For this tutorial example I'm using a "Web Safe" color chart as my color source. I could use any source of color that can be seen on my display so it could be almost any graphic or photo etc. I have included a link to a full size version of this "Web Safe" chart at the end of this tutorial for those interested in building their own set of web safe colors. I just drag the external color selector over the top of the desired color and click on it to clone it to my color edit panel and to my currently selected color palette swatch. How easy is that?!

Now that I have my first color selected, I can edit the color name as desired. I changed "Default" to the color name from the web safe chart for this color which is "330000". That's a personal preference, I could have just as easily named it "dark burgundy" or whatever .

That's all there is to capturing a color swatch to your custom color palette. So next I click on the "+" sign icon to add another color swatch to my palette. I then double click on that new swatch to open the color edit panel and I use the external color selector to clone my next color exactly as I did before except I selected a different color from my "Web Safe" chart.

I rename the newly added color and then repeat the process to add another color swatch and clone in the next color from my "Web Safe" chart.

As you can see I am filling my palette with the colors from the "Web Safe" chart. The order in which I add the colors is a personal preference. And this process works for building any color palette set of colors not just one of "web safe" colors as I'm doing in this example.

When I finish building my new custom color palette, I want to save it for reuse in many future TBS projects. Right now it is specific to the project in which I am currently working. I want to "export" my "Web Safe" color palette. We will click on the context menu icon to the right of the "name" drop down text box, which will open the context menu for us to use to select "Export Palette".

This opens an export dialog panel where all my current project color palettes are listed and I can check which ones I want to export and the destination of where I want them saved on my system. I have a Toon Boom Studio directory with a Palettes subdirectory on my system but that's just a personal preference. That's all there is to exporting and saving a custom color palette, which you can now access and use in future TBS projects.

It is very easy to import a custom color palette into a new project. We just go to our color palette panel and we click on the context menu icon to the right of the "name" drop down text box, which will open the context menu for us to use to select "Import Palette".

This opens an import dialog where we can select the desired custom palette we want to import into our TBS project.
As I mentioned earlier there is a great deal more information pertaining to all the uses of the Toon Boom Studio color management system so check back for future articles and tutorials.

Click on this chart to access a full size version.
Labels: Color Management, Tutorial


